
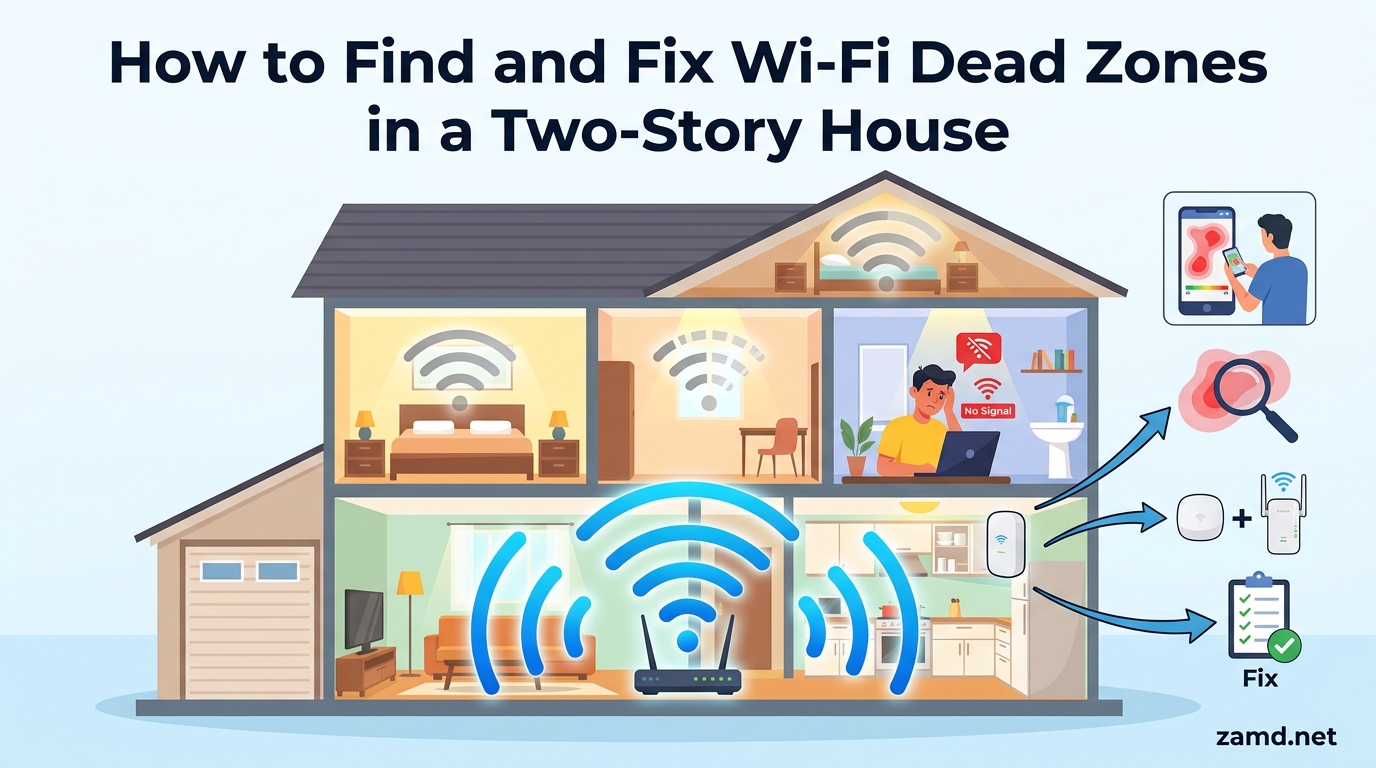
If your video calls drop the moment you walk upstairs, your movie buffers in the back bedroom, or your phone stubbornly switches to cellular data in the kitchen, you are dealing with WiFi dead zones. Figuring out how to find and fix Wi-Fi dead zones in a two-story house is one of the most common home networking headaches, and it is completely solvable without an IT degree.
I have helped friends, family members, and readers troubleshoot multi-story WiFi issues for years. The same patterns come up every time: the router sits in a corner of the first floor, the signal has to fight through floors, ductwork, and concrete walls, and the upstairs turns into a connectivity wasteland. The good news is that a systematic approach can turn a frustrating connection into wall-to-wall coverage.
This guide walks through the entire process from start to finish. You will learn what dead zones actually are, what causes them, how to map them using free tools, and how to fix them using solutions ranked from free tweaks to full mesh system upgrades. I have tailored every section specifically to the challenges of two-story and multi-level homes, because the strategies that work in a single-story apartment do not always translate when you add a ceiling and a second floor into the mix.
Table of Contents
What Is a WiFi Dead Zone?
A WiFi dead zone is any area in your home where the wireless internet signal is too weak to maintain a reliable connection. Your phone or laptop may show a WiFi icon, but pages refuse to load, speeds crawl, or the connection drops entirely. In some cases, your device will not detect the network at all.
Dead zones exist on a spectrum. Some spots have a weak but functional signal that works for email but crumbles during a video call. Other spots are true dead zones where no signal reaches at all. Understanding where your home falls on that spectrum is the first step toward fixing the problem.
Here are the most common symptoms of a WiFi dead zone:
- Web pages stall or fail to load entirely in certain rooms
- Streaming video drops to low quality or buffers constantly
- Video calls freeze, lag, or disconnect when you change rooms
- Online games show sudden latency spikes or disconnect
- Your phone automatically switches from WiFi to cellular data
- Smart home devices lose connection or respond slowly
- Downloads that start fast suddenly trickle to a halt
If you recognize three or more of these symptoms in specific rooms, you have confirmed dead zones that need attention. The next question is why they exist in the first place.
What Causes WiFi Dead Zones in a Two-Story House?
WiFi signals are radio waves operating on the 2.4GHz, 5GHz, or 6GHz frequency bands. Like any radio signal, they can be absorbed, reflected, or blocked by physical materials. In a two-story house, the signal has to contend with both horizontal obstacles (walls, furniture, appliances) and vertical obstacles (floors, ceilings, ductwork). Understanding the specific barriers in your home is the key to choosing the right fix.
Physical Obstructions and Building Materials
The single biggest cause of dead zones is the physical structure of your home. Different materials weaken WiFi signals at different rates. Drywall and wood are relatively transparent to radio waves, but the moment you introduce denser materials, the signal degrades fast.
Here is how common building materials affect WiFi signal strength:
- Drywall and wood partitions: Minimal signal loss, roughly 10-20% reduction
- Brick walls: Moderate signal loss, 30-40% reduction
- Concrete walls and floors: Heavy signal loss, 50-80% reduction
- Metal ductwork and chimneys: Near-total signal blockage in direct line
- Water tanks and large aquariums: Significant absorption, water blocks RF signals effectively
- Mirrors and metal-backed insulation: Reflect signals away, creating shadow zones
Older homes are particularly challenging. If your two-story house was built with plaster walls containing metal lath, thick brick interior walls, or concrete block construction, standard WiFi solutions may struggle. I have seen 100-year-old homes where the construction materials alone create more signal loss than the distance between floors.
Distance From the Router
WiFi signal strength decreases with distance following the inverse-square law. Double the distance from your router and the signal strength drops to roughly a quarter of its original power. In a two-story house, this becomes critical because the router is often positioned on one floor, and the signal has to travel diagonally through ceilings and walls to reach the opposite corner of the other floor.
The 2.4GHz band reaches farther than 5GHz, which is why your phone may cling to a weak 2.4GHz signal in a distant bedroom rather than connecting to a stronger 5GHz band that simply cannot reach that far. This is also why some devices perform worse upstairs even though they show a connection.
Signal Interference From Other Devices
Your router is not the only device broadcasting on radio frequencies. Many household electronics operate on or near the 2.4GHz band, creating interference that degrades your WiFi signal. In a two-story home, a microwave on the first floor can briefly kill the WiFi on the second floor if the signal path passes through the kitchen.
Common interference sources include:
- Microwave ovens (strong 2.4GHz interference while running)
- Baby monitors and wireless security cameras
- Cordless phones operating on 2.4GHz
- Bluetooth devices, which share the 2.4GHz band
- Smart home hubs and Zigbee or Z-Wave devices
- Neighbor WiFi networks on overlapping channels
- Fluorescent and some LED light ballasts
Floor Penetration Challenges
The factor that makes two-story homes uniquely difficult is floor penetration. A standard residential floor with joists, subfloor, hardwood or carpet, and a ceiling below contains multiple layers of material that the signal must pass through. Add metal HVAC ducts running between floors, and you have an effective barrier that can reduce signal strength by 50% or more.
This is why the single most common complaint I hear is: “The WiFi works great downstairs but is basically nonexistent upstairs.” The floor itself is acting as a signal blocker, and no amount of channel switching or firmware updates will fully solve a structural barrier.
How to Find WiFi Dead Zones in Your Home
You cannot fix what you have not measured. Finding dead zones is a straightforward process that combines a physical walkthrough of your home with free diagnostic tools. The goal is to create a signal map that shows exactly where coverage is strong, weak, and nonexistent.
Here is the step-by-step process I recommend:
Step 1: Run a Baseline Speed Test
Start near your router and run a speed test using Ookla Speedtest, Fast.com, or the built-in speed test in your router’s app. Note the download speed, upload speed, and ping. This is your baseline. If you are paying for 500 Mbps and getting 480 Mbps next to the router, you know your baseline is solid and any drop-off elsewhere is a coverage issue, not an ISP problem.
Write down the results. You will compare every other room against this number.
Step 2: Walk Through Your Home Room by Room
With your phone or tablet connected to WiFi, walk through every room on both floors. In each room, run a speed test and note the results. Pay special attention to corners, rooms farthest from the router, areas behind thick walls, and spaces near large metal appliances.
Walk slowly. Signal strength can change dramatically within a few feet, especially near walls and doorways. I once found a dead zone that existed only in a three-foot strip between a bathroom and a hallway, caused by a metal plumbing stack inside the wall.
Step 3: Use a WiFi Analyzer App for Precise Readings
Speed tests tell you performance, but a WiFi analyzer app tells you signal strength in measurable units. Download one of these free apps:
- Netspot (macOS, Windows) – Creates visual heatmaps of your home
- Fing (iOS, Android) – Shows signal strength and identifies all devices on your network
- WiFi Analyzer (Android) – Displays channel congestion and signal strength in real time
- Airport Utility (iOS) – Apple’s hidden WiFi scanner built into the Airport Utility app
These apps measure signal strength in dBm (decibel-milliwatts), which is the standard unit for radio signal power. Understanding dBm values is the single most useful skill for diagnosing WiFi problems.
Step 4: Read the dBm Signal Strength Values
WiFi signal strength is measured in negative numbers, where closer to zero is stronger. Here is a quick reference to help you interpret the readings from your analyzer app:
- -30 to -50 dBm: Excellent signal. You are right next to the router. Maximum speeds.
- -50 to -60 dBm: Good signal. Fast, reliable connections for all activities including streaming and gaming.
- -60 to -67 dBm: Fair signal. Acceptable for most tasks, but video calls and gaming may show occasional lag.
- -67 to -70 dBm: Weak signal. Streaming may buffer, and large downloads will slow significantly.
- -70 to -80 dBm: Very weak signal. Basic browsing works but most activities will struggle.
- Below -80 dBm: Unusable signal. This is a true dead zone where most devices will disconnect entirely.
Anything below -67 dBm in a room where you need reliable connectivity is a dead zone that needs fixing. Walk through your home and write the dBm reading for each room on a simple floor plan sketch. This creates your signal map.
Step 5: Create a Simple Heat Map
If you want to go deeper, Netspot’s survey mode lets you load a floor plan image and tap your location as you walk through the house. The app builds a color-coded heatmap showing exactly where signal is strong (green), moderate (yellow), and weak (red). This is the single most effective way to visualize dead zones in a two-story home.
If you do both floors, you will typically see a clear pattern: strong signal near the router on its floor, rapidly degrading signal at the edges of that floor, and noticeably weaker signal across the entire opposite floor. This pattern tells you exactly where to focus your fix.
How to Fix WiFi Dead Zones (Step-by-Step Solutions)
Once you have mapped your dead zones, it is time to fix them. I have ordered these solutions from the easiest and free fixes to the most advanced and expensive upgrades. Start at the top and work your way down until your dead zones are resolved.
Fix 1: Reposition Your Router (Free)
This is the single most impactful free fix, and it solves a surprising number of dead zone problems. Most people place their router wherever the ISP technician installed it, which is usually wherever the cable entered the house. That location is rarely optimal for coverage.
For a two-story house, the best router placement follows two rules: central horizontally and central vertically. Here is what that means in practice:
- Ideal location: On the ceiling of the first floor, or on the floor of the second story. These positions sit at the vertical midpoint of the home, giving the signal the most balanced path to both levels.
- Good alternative: A central room on the first floor, mounted high on a wall or on a high shelf. The higher the router, the better the signal clears furniture and reaches the second floor.
- Avoid: Corners, closets, basements, behind the TV, inside cabinets, or directly on the floor in a single-story-style placement.
- Also avoid: Kitchens (appliance interference), bathrooms (plumbing and water block signal), and exterior walls (signal wasted broadcasting outside).
Routers broadcast signal outward in a roughly donut-shaped pattern from the antenna. Positioning the router centrally and elevating it maximizes the useful portion of that signal pattern. I have seen a simple router repositioning from a corner to a central hallway improve upstairs signal by 30-40% with zero cost.
Fix 2: Adjust Your Router’s Antennas (Free)
If your router has external antennas, their orientation matters. Most antennas are omnidirectional, meaning they broadcast outward perpendicular to the antenna’s length. A vertical antenna sends signal horizontally, which is ideal for single-floor coverage but less effective for reaching the floor above.
For a two-story home, try positioning one antenna vertically and one at a 45-degree angle. This gives the signal both horizontal and vertical components, improving floor penetration. Experiment with different positions and re-test with your WiFi analyzer app to see which orientation gives you the best upstairs dBm readings.
If your router has internal antennas only, this step does not apply. However, some routers let you adjust internal antenna orientation through the admin interface, so it is worth checking your router’s settings.
Fix 3: Update Your Router Firmware (Free)
Router manufacturers regularly release firmware updates that improve performance, fix bugs, and enhance signal handling. Many routers install these updates automatically, but older models may require manual updates through the admin interface.
To check for updates, log into your router’s admin panel (usually by typing 192.168.1.1 or 192.168.0.1 into a browser) and look for a firmware or system update section. If an update is available, install it and restart the router. This is a quick check that occasionally delivers surprising improvements.
Fix 4: Switch WiFi Channels (Free)
If you live in a neighborhood or apartment-adjacent area, your WiFi may be competing with neighboring networks on the same channel. The 2.4GHz band has only three non-overlapping channels (1, 6, and 11), and if multiple nearby networks share the same channel, everyone’s signal degrades.
Use your WiFi analyzer app to see which channels are congested in your area. The app will show a graph of all nearby networks and their channels. Switch your router to the least congested channel through the admin interface. For the 5GHz band, there are many more channels available, so congestion is less common but still worth checking.
This fix is most effective in dense suburban or urban areas where you can see five or more neighboring WiFi networks. In a rural setting, channel congestion is unlikely to be your problem.
Fix 5: Switch Between 2.4GHz and 5GHz Bands (Free)
Most modern routers broadcast on both 2.4GHz and 5GHz bands, and many use band steering to automatically assign devices. The two bands have very different characteristics:
The 2.4GHz band reaches farther and penetrates walls and floors better, making it the better choice for devices on the opposite floor from the router. However, it is slower and more prone to interference from other household devices.
The 5GHz band delivers significantly faster speeds and has more channels with less interference, but its range is shorter and it struggles to penetrate solid floors and walls.
For a two-story home, the ideal strategy is to connect devices that need speed (streaming TV, gaming console, work laptop) to 5GHz when they are on the same floor as the router, and switch them to 2.4GHz when they are on the opposite floor. Many routers let you create separate network names (SSIDs) for each band so you can manually control which band each device uses.
If your router supports WiFi 6E or WiFi 7, it also broadcasts on the 6GHz band. This band offers the fastest speeds and the most channels with essentially zero interference from neighbors, but its range is the shortest of the three. Think of 6GHz as a high-speed express lane that works best when you are close to the router or a mesh node.
Fix 6: Use a WiFi Extender, Booster, or Repeater ($15-$100)
When free fixes are not enough, a WiFi extender is the least expensive hardware solution. Extenders (also called boosters or repeaters, the terms are largely interchangeable) pick up your existing WiFi signal and rebroadcast it to extend coverage into dead zones.
For a two-story home, place the extender on the floor opposite the router, positioned where it can still receive a decent signal from the main router. If the extender is placed in an already-dead zone, it will just rebroadcast a weak signal, which is a common mistake. The general rule is to place the extender halfway between the router and the dead zone.
The main limitation of extenders is that they typically cut your bandwidth in half because they use the same radio to both receive and transmit. They also create a separate network name in many cases, so your phone may not automatically switch between the main router and the extender as you move between floors. For a single dead room, an extender is a cost-effective fix. For multiple dead zones across a large two-story home, you will likely need a more comprehensive solution.
Fix 7: Try a Powerline Adapter ($30-$80)
A powerline adapter uses your home’s existing electrical wiring to transmit internet data. You plug one unit into an outlet near your router and connect it with an Ethernet cable, then plug a second unit into an outlet in the room with the dead zone. The second unit either provides an Ethernet port for a wired connection or broadcasts its own WiFi signal.
Powerline adapters work well in homes where running Ethernet cable is impractical, and they sidestep the wall and floor penetration problem entirely by using electrical wiring as the signal path. However, performance depends heavily on the quality and age of your home’s electrical wiring. Older homes with outdated wiring may see significant speed loss. Powerline adapters also require both units to be on the same electrical circuit phase, which can be hit or miss in some homes.
In my experience, powerline adapters are an excellent middle-ground solution for a single room on the opposite floor from the router, especially for a smart TV or gaming console that benefits from a wired connection.
Fix 8: Install a Mesh WiFi System ($150-$500)
For comprehensive two-story home coverage, a mesh WiFi system is the most effective solution. Unlike a single router or an extender, a mesh system uses multiple nodes placed throughout your home. These nodes communicate with each other to create a single, seamless network that blankets both floors with consistent coverage.
The key advantage of mesh is that your devices automatically connect to whichever node has the strongest signal, and the system handles the handoff as you move between floors. There is no need to manually switch networks. You walk from the first floor to the second floor and your video call continues without interruption.
For a typical 2,000-2,500 square foot two-story home, a two-node mesh system provides excellent coverage. For larger homes (3,000+ square feet) or homes with thick walls, a three-node system is recommended. Popular options include Eero, Google Nest WiFi, TP-Link Deco, and Netgear Orbi.
Mesh node placement for two-story homes: Place the main node (connected to your modem) on the first floor in a central location. Place the second node on the second floor, centrally located and within range of the first node. For a three-node system, the third node goes wherever the remaining dead zone exists, whether that is a basement, garage, or far bedroom.
If your home is wired for Ethernet, you can connect mesh nodes using Ethernet backhaul, which means each node gets a dedicated wired connection to the main node. This dramatically improves performance because the nodes do not have to share wireless bandwidth for inter-node communication. If you have Ethernet ports on both floors, this is the single best configuration for a two-story home.
Fix 9: Upgrade to a WiFi 6, 6E, or 7 Router ($100-$700)
If your router is more than four or five years old, upgrading to a newer standard can significantly improve coverage and speed. Here is what each generation offers for two-story homes:
WiFi 6 (802.11ax): Better performance in homes with many connected devices. OFDMA technology allows the router to communicate with multiple devices simultaneously, reducing congestion. A meaningful upgrade over WiFi 5 for any smart home.
WiFi 6E: Adds the 6GHz band, which provides a wide-open spectrum with no interference from neighbors or older devices. This band delivers exceptional speeds when you are in range, making it perfect for a high-bandwidth device on the same floor as the router.
WiFi 7: The newest standard, offering multi-link operation that can use multiple bands simultaneously for a single device. WiFi 7 routers deliver the best range and speed currently available, which translates to better floor penetration and faster upstairs speeds.
A newer router alone will not solve all dead zone problems if the issue is structural (thick walls, multiple floors), but it gives you a stronger starting signal and better handling of multiple devices. Pairing a new router with mesh nodes is the most powerful combination.
Fix 10: Run Ethernet Cable to Dead Zones ($20-$60)
The most reliable connection is a wire. If you are comfortable running Ethernet cable through walls, attics, or basements, you can connect an access point directly to your router and place it on the opposite floor. Ethernet cable can run up to 100 meters (328 feet) without signal loss, which is more than enough for any residential home.
This approach requires more effort but delivers the best possible performance. An access point connected via Ethernet operates as if it were the main router, with no bandwidth splitting or wireless backhaul overhead. For gaming rooms, home offices, or smart TV locations where you need maximum stability, a wired access point is unbeatable.
Many Reddit users in r/HomeNetworking recommend running Ethernet whenever possible, even if you also use a mesh system. The combination of Ethernet backhaul for mesh nodes plus wired connections for high-priority devices gives you the best of both worlds.
Two-Story House Specific Dead Zone Scenarios
Every two-story home has its own quirks, but certain dead zone patterns come up again and again. Here are the most common two-story scenarios and the specific solutions that work for each.
The Upstairs Dead Zone
This is the classic two-story WiFi problem. The router sits on the first floor, and the entire second floor suffers from weak signal. The cause is simple: the floor and ceiling between levels are absorbing the signal before it reaches upstairs.
The most effective fix is to add a second source of WiFi on the second floor. This can be a mesh node, a WiFi extender placed at the top of the stairs (where it can still receive a decent signal from below), or an access point connected via Ethernet. A ceiling-mounted access point on the second floor landing provides excellent coverage for all upstairs rooms.
The Basement or Lower Level Dead Zone
If your two-story house has a basement, that level often has the worst WiFi of all. Concrete foundation walls, ductwork, and the main floor above all work together to block signal. Basements are also where many people place their router, since that is where the internet service enters the home, which means the signal has to fight upward through two floors to reach the second story.
If your router is in the basement, the first fix is to move it to the first floor. If the router must stay in the basement due to wiring constraints, run an Ethernet cable to the first floor and add an access point or mesh node there. The basement can then be covered by a separate extender or mesh node.
The Attic or Loft Dead Zone
Finished attics and loft conversions are popular bonus rooms in two-story homes, but they are often WiFi dead zones due to their distance from the main router and the insulation, ductwork, and roof materials surrounding them. A mesh node placed on the second floor, as close to the attic access as possible, is usually the best fix.
If the attic is a frequently used space like a home office or bedroom, consider running an Ethernet cable through the interior wall and installing a dedicated access point. Insulation, particularly foil-backed insulation, acts as an effective signal barrier, so wireless-only solutions may underperform.
The Detached Garage Dead Zone
If your garage is attached, a WiFi extender placed in the room nearest the garage can often push signal through the shared wall. For a detached garage, the distance and exterior walls make wireless extension difficult.
The most reliable solution for a detached garage is a point-to-point wireless bridge or a powerline adapter if the garage shares electrical wiring with the main house. Some mesh systems also offer outdoor-rated nodes that can bridge the gap between the house and garage.
The Backyard or Patio Dead Zone
For outdoor coverage, you need weatherproof access points designed for exterior mounting. Some mesh systems offer outdoor nodes that integrate seamlessly with your indoor network. Alternatively, an outdoor-rated access point connected via Ethernet to your router provides strong coverage for patios, decks, and yards.
Avoid using a standard indoor extender near a window pointed outside, as the glass and wall materials significantly weaken the signal before it ever reaches your yard.
Choosing the Best WiFi Solution for Your Two-Story Home
With so many options, it can be hard to know which solution is right for your situation. Here is a comparison of the three main hardware approaches to help you decide.
WiFi Extender vs Mesh Network vs Powerline Adapter:
- WiFi Extender: Best for a single small dead zone. Cheapest option at $15-$100. Easy to set up. Limitations include halved bandwidth and no seamless roaming between networks. Ideal for one room or a small apartment-style layout.
- Mesh Network: Best for whole-home coverage across multiple floors. Costs $150-$500 for a two or three node system. Provides seamless roaming, single network name, and consistent speeds. The recommended solution for any two-story home over 2,000 square feet or with multiple dead zones.
- Powerline Adapter: Best for a single room where wireless signal cannot reach but Ethernet is not feasible. Costs $30-$80. Performance depends on electrical wiring quality. Good for smart TVs, gaming consoles, or desktop computers in a remote room.
Decision guide based on home size: For homes under 1,500 square feet, a well-positioned single router may suffice. For 1,500-2,500 square feet, a router plus one extender or a two-node mesh system handles most layouts. For homes over 2,500 square feet, especially two-story homes, a three-node mesh system is the most reliable choice.
Decision guide based on construction: If your home has standard drywall or wood frame construction, standard mesh systems will perform well. If you have concrete walls, plaster with metal lath, or brick interior walls, plan for more nodes or consider running Ethernet to access points. No wireless solution fully defeats solid concrete, so wired backhaul becomes more valuable in these homes.
When to consider professional installation: If your home is pre-wired with Ethernet, a professional can install access points in ceiling mounts for a clean, whole-home solution. This costs more upfront but delivers the best possible performance and aesthetics. For homes without existing wiring, a mesh system is typically the more practical DIY solution.
FAQ’s
How to find dead zones in your house?
Where is the best place to put WiFi in a 2 story house?
Do I need a mesh router for a 2 story house?
Do WiFi extenders really work for fixing dead spots?
What is a major disadvantage of a mesh network?
Why is my upstairs WiFi so slow in my two-story house?
Can WiFi go through floors in a two-story house?
Wrapping Up: Eliminating Dead Zones for Good
Learning how to find and fix Wi-Fi dead zones in a two-story house comes down to two phases: mapping the problem and applying the right solution. Start with free fixes like repositioning your router to a central, elevated location and adjusting your antennas. If those are not enough, use a WiFi analyzer app to pinpoint exactly where the signal falls below -67 dBm, then add hardware based on the severity and scope of your dead zones.
For a single problematic room, a WiFi extender or powerline adapter does the job. For whole-home coverage across two floors, a mesh system is the most reliable investment you can make. And if your home has concrete walls or challenging construction, combining a mesh system with Ethernet backhaul gives you the best possible performance.
Walk through your home this weekend with a free WiFi analyzer app, map your dead zones, and start with the free fixes. You may be surprised how much improvement a simple router repositioning delivers before you spend a single dollar on new hardware.